Installation
Olex runs on Linux. MIS sells and installs Olex directly, without a reseller network: for an installation, contact us.
This page sets out the technical recommendations of the former website. The step-by-step procedures it described (installing Fedora Core, then version 7.39 of Olex of 8 November 2013) are out of date and are not reproduced here.
The PC
Recommendations from the former website:
- MIS recommended the Scientific Linux distribution (its preference) or CentOS; Red Hat Enterprise Linux and Fedora were also possible.
- The PC must be able to run Linux. The most critical point is the video chip, which must be supported by Xorg.
- The PC must have an Ethernet port and serial ports. Additional PCI cards are best fitted before installing Linux and Olex.
- Provide plenty of RAM: at least 4 GB.
- A powerful processor is not needed: Olex runs on an Atom-type processor.
- For a laptop, check its Linux compatibility before buying.
- To keep Windows on the same PC, first partition the disk to create a Linux partition of at least 20 GB, for example with GParted from a Linux Live CD.
These recommendations were drawn up at the time of the former website; contact us for current hardware.
Installing Olex
In the former website’s procedure, Olex was installed from its installation CD once Linux was in place:
you simply ran the installer (sh /media/installer). Installation took 10 to 15 minutes depending on the
computer and ended with the message Successful installation; the PC then restarted directly into Olex.
The installation sets the PC up for use on board: it starts Olex automatically.
Obtaining the licence
- In the Config menu, switch the menus to the language you want.
- Insert a USB key.
- In the Config menu, choose the item that saves data to the backup unit.
- Choose the USB key, then the hardware id button, to save your PC’s
idfile. - Send this
idfile as an attachment to sales@justmagic.com.
MIS sends you back the Olex software key by email, a file called nokkel. Then:
- Copy the
nokkelfile to the USB key and insert it into the Olex PC. - In the Config menu, choose the item that reads data and software, then select the
nokkelfile. - Restart the PC with the exit item of the Config menu.
Documentation
At the time of the former website, the Olex software and its English manual were distributed on the FTP server of Olex AS, the developer (olex.no). The former website also offered these documents in French:
- sales brochures: version 4 and version 5 (PDF);
- advertising banner;
- user manual, version 4.10: PDF (4.45 MB) or online;
- user manual, version 5.30: PDF (5.9 MB).
These documents describe old versions of Olex.
Connecting the instruments
The PC needs at least 2 serial ports to connect the GPS and the echo sounder, and 5 if there are additional interfaces with the ARPA radar, the gyrocompass or the autopilot.
| Instrument | NMEA 0183 sentences |
|---|---|
| GPS or DGPS, set to the WGS84 datum | GGA (ship’s position and satellite information), RMC or ZDA (date and time, for tide calculation) and VTG (course and speed over ground), all required |
| Echo sounder | either DBT (depth below transducer), DBS (below surface) or DEP (below surface, with offset) |
| Gyrocompass | HDT |
| ARPA radar | TTM |
| Autopilot (input) | RMB and APB |
Olex is also compatible with satellite compasses (at the time of the former website: Furuno SC-30, SC-50 and SC-110, JRC JLR-10, JLR-20 and JLR-30, Thales Ashtech 3011). They provide the position and true heading, but also pitch and roll, for a better bathymetry calculation.
MIS recommends using an optocoupler to galvanically isolate and protect the PC’s serial inputs and outputs.
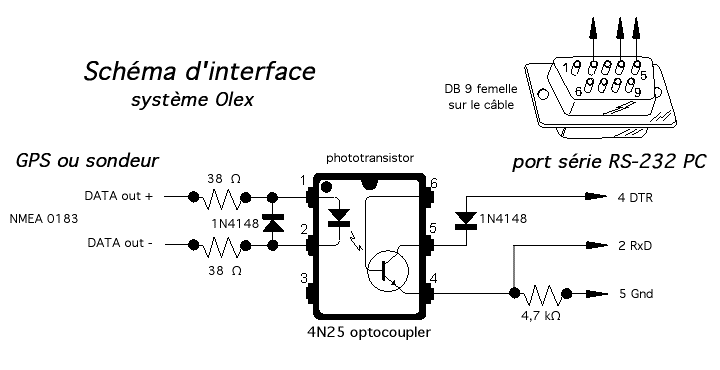 Example diagram for a standard (non-laptop) PC
Updated : October 2026